Image Preview
1 / 1
HomeLearnHow to Get Unique Values from SharePoint Lists in Power Automate Using Select and Union
⚡ IntermediatePower AutomateSharePoint9 min readMarch 2025

How to Get Unique Values from SharePoint Lists in Power Automate Using Select and Union

Learn how to extract unique values from SharePoint list columns using Power Automate. This guide covers the Select action to isolate specific columns, the union expression to remove duplicates, and building HTML tables to display unique data in emails or notifications.

RL
Rob Lees
Founder & Principal Consultant
Share

Overview

SharePoint lists often contain duplicate values across rows—multiple entries with the same email address, department, or status. Power Automate’s union expression combined with the Select action allows you to extract unique values from any column, enabling you to send consolidated reports, identify distinct users, or build dynamic recipient lists without duplicates.

Prerequisites

  • Power Automate cloud flow experience
  • Understanding of SharePoint lists and columns
  • Familiarity with Get items action
  • Basic knowledge of expressions and dynamic content

Why Extract Unique Values from Lists?

SharePoint lists frequently contain duplicate values. An expense tracking list might have dozens of entries from the same email address. A project task list could show the same department name across multiple rows. When you need to send a summary email to each unique person, or report on distinct categories, you need a way to filter out duplicates and work with only the unique values.

Power Automate doesn't have a built-in "Get unique values" action, but you can achieve this using two techniques:

  • Select action – Isolates a specific column from your list data, creating an array of just that column's values
  • union() expression – Compares two arrays and returns only unique values, effectively removing duplicates when you union an array with itself

This guide demonstrates extracting unique email addresses from a SharePoint list, then using those addresses to retrieve user-specific records and send personalised emails. The same pattern works for any column—Status, Department, Category, assigned user, or any other field where you need distinct values.

💡 Key Concept

The union expression removes duplicates by comparing two arrays and returning values that appear in either array—but only once. When you union an array with itself, union(variables('MyArray'),variables('MyArray')), you get back the same array with all duplicates removed. This is the core technique for extracting unique values in Power Automate.

Example List Structure

For this guide, we'll use an expense submission list where multiple employees submit expenses throughout the month. Each employee might have several expense entries, but we want to send one consolidated email per person showing all their submissions.

List columns:

Column Name Type Purpose
Title Single line of text Expense description
Amount Number Expense amount in pounds
Category Choice Travel, Meals, Equipment, etc.
Email Single line of text Employee email address
Status Choice Submitted, Approved, Rejected
SubmissionDate Date and Time When expense was submitted

The list will have multiple rows with the same email address—John might have submitted five expenses, Sarah might have submitted three. Our goal: extract the unique email addresses (John, Sarah, etc.), then for each unique person, get all their expense records and email them a summary.

The first step will be to run a scheduled flow that retrieves all list items and extracts the unique email addresses. Below is an example SharePoint list we'll use.

The flow will run on a schedule (e.g., first Monday of each month) – Author

⚠️ Column Naming

Use internal column names (schema names) in Power Automate expressions, not display names. If your column is called "Employee Email" in SharePoint, the internal name might be "EmployeeEmail" or "Employee_x0020_Email". Check the column's internal name by viewing list settings or examining the Get items output in a test flow run.

Creating the Unique Values Flow

The flow logic consists of several steps: retrieve all list items, select just the email column, remove duplicates, then loop through each unique email to get that person's records.

1
Add trigger: Recurrence

Set frequency to monthly, running on the first Monday (or your preferred schedule).

2
Add action: Get items

From SharePoint connector, select your site and expense list. Leave Filter Query and Top Count empty to retrieve all items.

3
Add action: Select

This action maps an array to extract specific properties. In From, select "value" from the Get items output. Under Map, click "Enter key" and type any label (e.g., "Email"). In the value field, select the Email column from Get items dynamic content.

Select action isolating Email column from all list items

The Select action output is now an array containing only email addresses: ["john@example.com", "sarah@example.com", "john@example.com", "mike@example.com", "sarah@example.com"]

Notice the duplicates—John and Sarah appear multiple times because they have multiple expense submissions. Now we'll remove those duplicates.

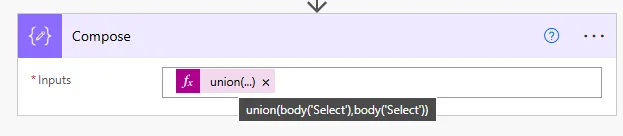
Using Union to Remove Duplicates

The union() expression takes two arrays and returns all unique values that appear in either array. When you pass the same array twice, it returns that array with duplicates removed.

1
Add action: Compose

Use a Compose action to hold the result of the union expression. Click in the Inputs field, then switch to the Expression tab.

2
Enter the union expression

Type this expression (you'll need to click between the Expression tab and Dynamic content tab to build it):

union(body('Select'),body('Select'))

This tells Power Automate: take the output of the Select action, union it with itself, and return only unique values.

Union expression removing duplicate values from email array

After the Compose action runs, the output is now: ["john@example.com", "sarah@example.com", "mike@example.com"]

All duplicates removed—we now have one entry per unique email address. This array becomes the basis for our loop in the next step.

💡 Pro Tip

Rename your Compose action to something descriptive like "Get Unique Emails" so when you reference it in expressions later, the expression reads as union(body('Get_Unique_Emails'),body('Get_Unique_Emails')) which is more self-documenting than union(body('Compose'),body('Compose')).

Looping Through Unique Values

Now that we have an array of unique email addresses, we can loop through each one and retrieve all expense records for that specific person.

1
Add action: Apply to each

For the input, select "Outputs" from the Compose action (the one containing your union expression). This loops through each unique email address.

2
Inside the loop: Add action Get items (second instance)

Add another Get items action. Configure for the same SharePoint site and list. This time, use Filter Query to retrieve only records for the current user.

3
Set Filter Query to match current email

In the Filter Query field, enter an OData filter that matches the Email column to the current item in the loop. The filter syntax is:

Email eq '@{items('Apply_to_each')?['Email']}'

This filters the list to return only items where the Email column equals the current unique email being processed in the loop.

Filtering SharePoint list to retrieve only current user's expense records

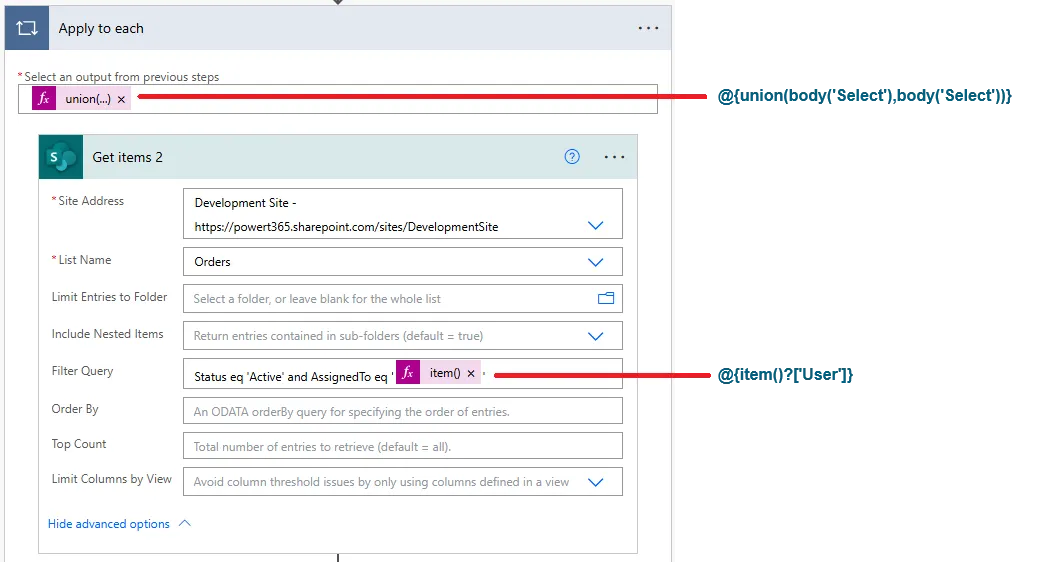
Important: If the internal column name differs from the display name, use the internal name in the filter. If your column is called "Employee Email" but the internal name is "EmployeeEmail", the filter becomes:

EmployeeEmail eq '@{items('Apply_to_each')?['Email']}'

Now for each unique email address (John, Sarah, Mike), the flow retrieves all expense records belonging to that person. The Get items output inside the loop contains only records where the Email column matches the current user being processed.

⚠️ OData Filter Syntax

OData filters use eq for equals, ne for not equal, gt for greater than, lt for less than. String values must be wrapped in single quotes. The expression @{items('Apply_to_each')?['Email']} retrieves the current loop item's Email property—make sure the property name matches exactly what you used in the Select action's Map key.

Creating an HTML Table to Display Records

Now that we have all expense records for the current user, we can format them into an HTML table to include in an email. Power Automate's Create HTML table action converts an array of objects into a formatted HTML table automatically.

1
Inside the Apply to each loop (after Get items): Add action Create HTML table

Search for "Create HTML table" from the Data Operations connector.

2
Set From to the Get items output

Click in the From field and select "value" from the Get items action (the second one inside your loop, not the first one at the start of the flow).

3
Optional: Customise columns

Click "Show advanced options". Change Columns from "Automatic" to "Custom". Add only the columns you want in the email table (Title, Amount, Category, SubmissionDate). This prevents internal SharePoint metadata columns from appearing in your table.

The Create HTML table output is now an HTML <table> element containing all the user's expense records with proper rows and columns. You can insert this directly into an email body.

4
Still inside the loop: Add action Send an email (V2)

Configure the To field with the current loop item's email: select "Current item" from Apply to each, then select "Email" property.

5
Build the email subject and body

Subject example: "Your Expense Summary for [Month]". In the Body, insert the Create HTML table output to display the user's records.

Complete flow logic summary:

  1. Trigger: Scheduled recurrence
  2. Get all items from SharePoint list
  3. Select: Extract Email column to array
  4. Compose: Apply union to remove duplicates
  5. Apply to each unique email:
  6. Get items filtered by current email
  7. Create HTML table from filtered records
  8. Send email to current user with their table

Each unique person receives one email containing an HTML table with all their expense submissions. No duplicates, no manual filtering required.

💡 Pro Tip

Add CSS styling to your HTML table for better email formatting. After the Create HTML table action, use a Compose action with a replace() expression to inject <style> tags: replace(outputs('Create_HTML_table'),'<table>','<style>table{border-collapse:collapse;width:100%;}th,td{border:1px solid #ddd;padding:8px;text-align:left;}th{background-color:#003540;color:white;}</style><table>')

Next Steps

You now understand how to extract unique values from SharePoint lists using the Select action and union expression, then use those values to retrieve and process records for each distinct item. This pattern works for any column type—email addresses, departments, categories, statuses, or custom choice fields.

Extend this technique by exploring:

  • Multiple unique columns – Extract unique combinations of two columns (e.g., Department + Status) by selecting both in the Map and adjusting the Filter Query accordingly
  • Aggregating data – Calculate totals per unique user using Compose actions with sum(), length(), or other aggregate expressions before building the HTML table
  • Conditional unique extraction – Filter the initial Get items by Status or Date before extracting unique values, allowing you to report on distinct active users, pending items, etc.
  • Dynamic recipients from unique values – Build a semicolon-separated string from unique email addresses to send one summary email to all distinct users: join(body('Compose'),';')
  • Sorting HTML tables – Add Order By to the filtered Get items action to control how records appear in each user's table
  • Using distinct() expression (preview) – Power Automate is introducing a distinct() expression in some tenants as an alternative to union for deduplication

The Microsoft workflow expression reference for union provides additional examples and syntax details for array manipulation and deduplication techniques.

Article Info
Intermediate
Assumes working knowledge of Power Automate and basic concepts.
9 min read  ·  March 2025
Prerequisites
Power Automate cloud flow experience
Understanding of SharePoint lists and columns
Familiarity with Get items action
Basic knowledge of expressions and dynamic content

Need this built for your business?

We design and build production-grade Power Platform solutions for FM, Construction and Manufacturing businesses.

Book a Discovery Call →