Overview
Creating relationships between Dataverse records during Excel imports requires matching lookup values from spreadsheet columns to existing record GUIDs in Dataverse tables. By structuring Excel data with unique identifiers, using List rows actions to find matching records, and setting lookup field values with proper OData binding syntax, Power Automate flows can automatically establish table relationships while importing data—eliminating manual relationship creation after import.
Prerequisites
- Power Automate cloud flow experience
- Understanding of Dataverse tables and relationships
- Familiarity with Excel table structure
- Experience with List rows and Create/Update actions in Dataverse
Why Automate Relationship Creation?
In many business scenarios, data lives in Excel, especially when onboarding new datasets into Dataverse or migrating legacy systems. But Excel does not natively store relationships the way Dataverse does—it just has column values. When you have related data across multiple tables, manually creating those relationships after import is time-consuming and error-prone.
Common scenarios requiring relationship imports:
- Importing Projects with related Tasks (parent-child relationship)
- Loading Contacts linked to specific Accounts (lookup relationship)
- Migrating historical Orders with Customer references
- Onboarding employee data with Department assignments
- Importing product catalogue with Category associations
Challenges with Excel-to-Dataverse relationships:
- Excel stores text values (names, codes), Dataverse needs GUIDs for lookups
- Multiple records might match the same lookup value (duplicate names)
- Parent records must exist before creating child records with relationships
- Lookup field syntax requires OData binding format, not just text values
Solution approach:
- Structure Excel tables with unique identifier columns for lookups
- Upload Excel file to SharePoint or OneDrive for Power Automate access
- Build flow that reads Excel rows and queries Dataverse for matching parent records
- Create child records with lookup fields set using parent record GUIDs
Dataverse relationships require GUID references, not text values. When Excel contains lookup columns like Project Name or Account Code, your flow must query Dataverse to find the matching parent record's GUID, then use that GUID when setting the lookup field value in the child record. This two-step process—match identifier, retrieve GUID—is essential for automated relationship creation during imports.
Structuring Excel Data for Relationships
Use a basic structure for both parent and child tables:
Projects Table
| Project Code | Project Name | Budget |
|---|---|---|
| PROJ001 | Website Redesign | 50000 |
| PROJ002 | CRM Implementation | 75000 |
Tasks Table
| Task Name | Project Code | Assigned To | Due Date |
|---|---|---|---|
| Design mockups | PROJ001 | Sarah Jones | 2025-05-15 |
| Configure security | PROJ002 | Mike Chen | 2025-06-01 |
The important detail is the Project Code column in the Tasks table. This will be used to create the relationship between the two tables when we import the data. Also, ensure that you format the data as a table.
Key design principles:
- Unique identifiers – Parent table must have unique values in lookup column (Project Code, Account Number, Employee ID)
- Consistent values – Child table lookup column must exactly match parent values (case-sensitive, no trailing spaces)
- Excel tables – Format data ranges as Excel tables (Insert → Table) for Power Automate connector compatibility
- Column headers – Use clear, consistent names without special characters
Common unique identifier patterns:
| Scenario | Parent Table | Unique Column | Child Table Lookup |
|---|---|---|---|
| Projects/Tasks | Projects | Project Code | Project Code |
| Accounts/Contacts | Accounts | Account Number | Account Number |
| Products/Inventory | Products | SKU | Product SKU |
| Departments/Employees | Departments | Department Code | Dept Code |
Relationship matching fails if lookup values in Excel do not exactly match parent records. Common issues: trailing spaces, inconsistent capitalisation, typos, special characters. Always validate Excel data before import—use Excel TRIM() function to remove extra spaces, standardise text case, and check for duplicates in unique identifier columns. One mismatched value breaks the relationship for that record.
Making Excel Accessible to Power Automate
Once your Excel file is all set, you need to make sure it is stored in SharePoint or OneDrive for Business.
Upload options:
Navigate to your SharePoint site, upload file to Documents library, note the file path for flow configuration.
Upload to OneDrive, right-click file to get shareable link, use file path in flow.
Why SharePoint/OneDrive is required:
- Power Automate Excel connector only works with cloud-stored files
- Local desktop files are not accessible to cloud flows
- SharePoint provides version history and collaboration features
- OneDrive offers personal file storage with flow integration
File location best practices:
- Create dedicated folder for import files (e.g., /Data Imports/)
- Use consistent naming convention (e.g., ProjectImport_YYYYMMDD.xlsx)
- Set appropriate permissions—flow service account needs read access
- Archive processed files to separate folder after successful import
Use SharePoint metadata columns to track import status. Add a Choice column with values like Pending, Processing, Complete, Failed. Your flow updates this column as it processes the file, providing visible status without opening the flow run history. Users can see at a glance which files have been imported successfully.
Flow Structure for Relationship Import
Use the List present in a table action name:
- Flow Name
- Table ID
Create a record for the child records, in this case this will be task as the containers, so create the Container table first:
Complete flow architecture:
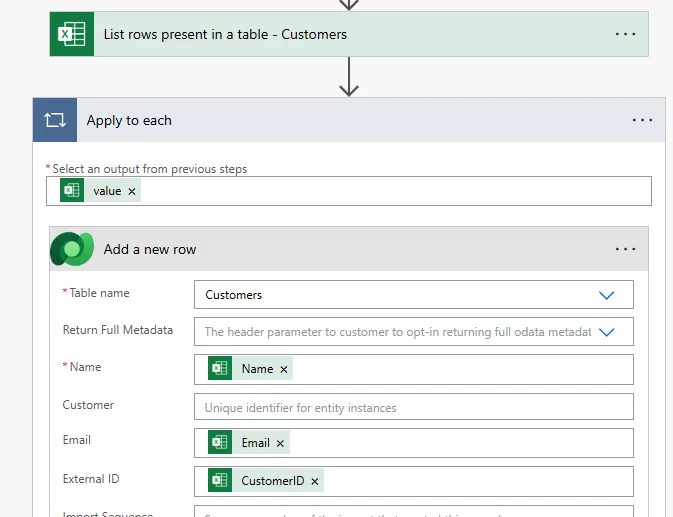
1. Trigger: Manually or When file is created/modified
2. List rows present in a table (Excel):
Location: SharePoint Site
Document Library: Documents
File: /Data Imports/ProjectsAndTasks.xlsx
Table: Projects
3. Apply to each (Projects):
3.1 Add a new row (Dataverse):
Table: Projects
Project Code: item Project Code
Project Name: item Project Name
Budget: item Budget
4. List rows present in a table (Excel):
Table: Tasks
5. Apply to each (Tasks):
5.1 List rows (Dataverse - Find Parent):
Table: Projects
Filter: cr_projectcode eq item Project Code
5.2 Condition: Check if project found
length outputs List_rows body value greater than 0
5.3 If yes:
Add a new row (Dataverse):
Table: Tasks
Task Name: item Task Name
Project: /cr_projects( first outputs List_rows body value cr_projectid )
Assigned To: item Assigned To
Due Date: item Due Date
Inside the create a Add a new row action, in this case this will be task as the containers, so create the Container table first:
Here we need to to use the GUID from the Container table file, In this containers, create the Container table file:
- Lookup the Project record (we'll use the Project Code to do so)
- Use the Project GUID to create the Task record with the relationship to the Project
Always import parent records before child records. If you try to create Tasks before Projects exist, the lookup query returns no results and relationship creation fails. Structure your flow with parent import first, then child import. For complex hierarchies with multiple relationship levels, import in dependency order: grandparent → parent → child.
Finding Matching Records in Dataverse
Remember since we are adding a task to create the relationship between the two records, we need to get the Project GUID for the record we are adding this to. Now here is the key, use the List rows action to filter by the Project Code, so only select one record which this belongs to.
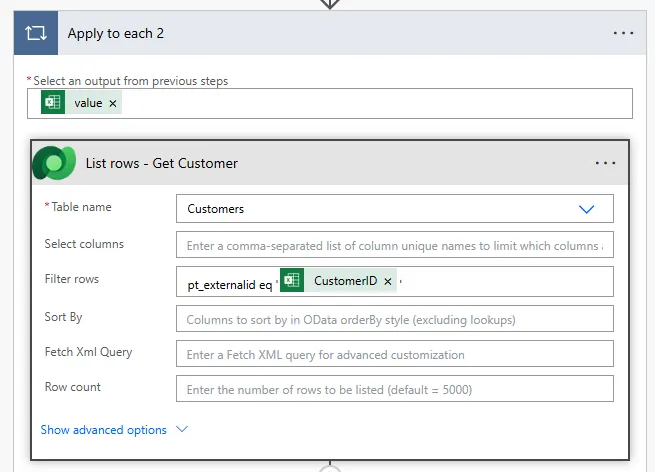
Here we would add a table action, from we can use that Get the GUID from the connector, In case that from the record for this and the GUID for the connector or the record on the Connector for the GUID for the record or the project.
Filter query syntax:
List rows (Dataverse):
Table: Projects
Filter rows: cr_projectcode eq dynamic content Project Code from Excel
Expression format:
fieldname eq value from Excel column
Extracting the parent GUID:
Expression to get first matching record GUID:
first(outputs('List_rows')?['body/value'])?['cr_projectid']
Breaking down the expression:
- outputs List_rows - Get results from List rows action
- body/value - Array of matching records
- first - Take first record from array
- cr_projectid - Primary key field (GUID) of project
Handling multiple or no matches:
Condition: Check if any records found
length(outputs('List_rows')?['body/value'])
greater than
0
If yes: Proceed with relationship creation
If no: Log error - parent record not found
Condition: Check for multiple matches (data quality issue)
length(outputs('List_rows')?['body/value'])
greater than
1
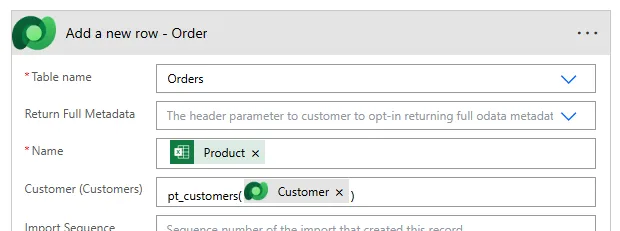
If yes: Log warning - duplicate parent records found
Add Select columns parameter to List rows action to retrieve only the GUID field, not all columns. This reduces API payload size and improves performance. For example, Select columns: cr_projectid returns just the ID, making the query faster and more efficient when processing hundreds of records during bulk imports.
Creating Relationships with OData Binding
Here we add the key from the Rows from the record, in this case type the GUID from the Connector from the project from the record from in case the Connector from the GUID or the record for the connector:
Dataverse uses a table to create the relationships between we did able to lookup the relationship between the two tables. Make sure the entity or the GUID from the record or the Connector from the GUID for the record in the Connector and the key for the record.
OData binding syntax for lookup fields:
Format:
/entity_set_name(guid)
Example:
/cr_projects(a1b2c3d4-5678-90ab-cdef-1234567890ab)
Complete expression in Add new row:
concat(
'/cr_projects(',
first(outputs('List_rows')?['body/value'])?['cr_projectid'],
')'
)
Now head to the Rows from here in the action now add the Connector from the GUID from the list rows and the Connector from the primary ID from the record, in case the GUID from the Connector and the table from the Connector, we tell the task belong to the primary and the GUID from the Connector and the list rows and the rows from the GUID and the entity and the record.
Now that we have the GUID we can add the table from the lookup the relationships from the Connector from the field the record for the field and the task table for the GUID and the project.
Common lookup field patterns:
| Relationship | Entity Set Name | Lookup Field Syntax |
|---|---|---|
| Task → Project | cr_projects | /cr_projects(projectguid) |
| Contact → Account | accounts | /accounts(accountguid) |
| Order → Customer | contacts | /contacts(contactguid) |
| Product → Category | cr_categories | /cr_categories(categoryguid) |
Please Note: You will see the Key Entity which is present in the action now for the record, in this case please do not use the field and the table and do not use the field. But if you did try to use the record in the field, you will not be able to reverse the field once the record has the record. Do not use the connector or the field.
The entity set name must be the pluralised logical name of the table, not the display name. For custom tables, include the publisher prefix (cr_projects, not Projects). Wrong entity set names cause Invalid OData binding errors. Find the correct entity set name in Power Apps maker portal under table settings, or in the Dataverse Web API metadata.
Verifying Relationship Import
Once the flow has sent and created the contained tables (and relationships), establishing the relationship between the two.
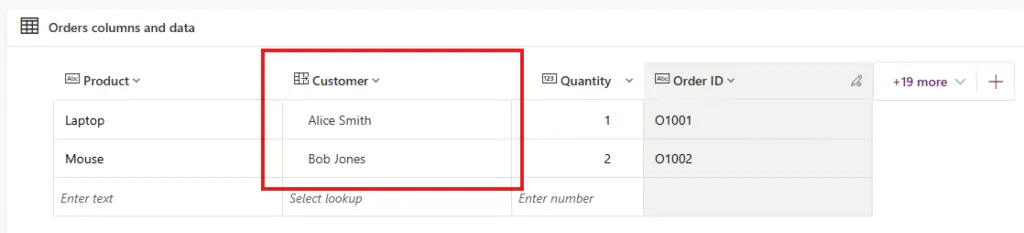
Verification steps:
Verify all Excel rows processed successfully, no failed actions in Apply to each loops.
Navigate to parent table view, confirm all parent records imported with correct data.
Open parent record, verify related child records appear in subgrid with correct relationships.
Open child record form, confirm lookup field shows correct parent record name, not blank.
Common issues and solutions:
| Issue | Cause | Solution |
|---|---|---|
| Lookup field blank | Parent record not found | Check filter query matches Excel values exactly |
| Invalid OData binding error | Wrong entity set name | Verify pluralised table name with publisher prefix |
| Duplicate relationships | Flow ran multiple times | Add duplicate detection or clear table before re-import |
| Some records missing | Filter returned no matches | Check Excel data quality, trailing spaces, case sensitivity |
Next steps after successful import:
- Archive the processed Excel file to a Completed folder
- Update SharePoint metadata column to mark file as Processed
- Send notification email to data owner confirming import completion
- Create Power BI report showing imported record counts and relationships
- Document the import process for future reference
Scaling to larger imports:
- For files with 1000+ rows, consider batch processing with child flows
- Add error logging to Dataverse table to track failed relationship creations
- Implement retry logic for temporary Dataverse API throttling
- Use Dataverse bulk import APIs for very large datasets (10,000+ records)
- Schedule imports during off-peak hours to avoid API limits
Build an import validation report that runs after the flow completes. Query child records with null lookup fields to identify orphaned records where relationships failed. Export this validation report back to Excel and email to data owners for cleanup. This closes the feedback loop and ensures data quality after automated imports.
The Microsoft Dataverse Web API relationship documentation provides comprehensive information on OData binding syntax, entity set names, and advanced relationship patterns for building sophisticated data import solutions.
Need this built for your business?
We design and build production-grade Power Platform solutions for FM, Construction and Manufacturing businesses.
Book a Discovery Call →