Overview
Error handling in Power Automate prevents single action failures from stopping entire workflows. Using Configure run after settings, Scope actions for try-catch patterns, and Parallel branches for fallback logic, you can build resilient flows that handle failures gracefully, log errors appropriately, and continue processing even when individual actions fail.
Prerequisites
- Power Automate cloud flow experience
- Understanding of triggers and actions
- Familiarity with conditions and variables
- Basic knowledge of flow design patterns
Why Error Handling Matters in Flows
In Power Automate, when an action encounters an error (invalid data, network timeout, API failure), the default behavior is for the entire flow to stop and mark as failed. This is problematic when flows handle critical business processes—you don't want one bad email address or missing file to prevent the other 99 successful operations from completing.
Error handling allows you to detect failures, respond appropriately, and continue processing. You can log errors, send notifications, retry operations, or execute alternative actions—all while keeping the flow running rather than failing immediately.
Common scenarios requiring error handling:
- Email sending fails because recipient address is invalid—continue processing other recipients
- SharePoint file creation fails because folder doesn't exist—create the folder first, then retry
- API call times out—wait and retry with exponential backoff
- Data transformation fails for one record—log the error, continue with remaining records
- Approval request expires—escalate to manager instead of stopping workflow
Configure run after is the foundation of error handling in Power Automate. By default, actions only run after the previous action succeeds. Configure run after lets you change this—actions can run after the previous action fails, times out, or is skipped. This enables try-catch patterns, fallback logic, and cleanup operations that execute regardless of success or failure.
Understanding Configure Run After
The fundamental way to handle errors in Power Automate flows involves in use the Run After setting, allowing you to control what actions you want executed when certain events happen in your flow.
Every action in Power Automate has a "Configure run after" setting that determines when it executes based on the previous action's outcome. By default, actions only run if the previous action is successful.
Run after conditions:
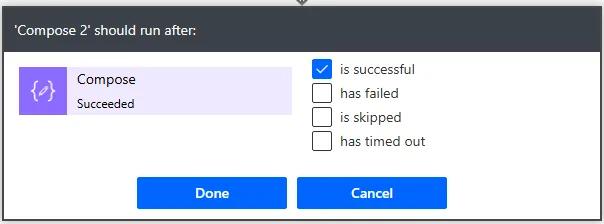
- is successful – Default. Action runs only if previous action completed successfully.
- has failed – Action runs only if previous action failed with an error.
- is skipped – Action runs only if previous action was skipped (condition evaluated to false).
- has timed out – Action runs only if previous action exceeded timeout limit.
To access the Configure run after, we need to click, select the three dots at an action box OR when adding an action, click the three dots next to that action to configure how it runs.
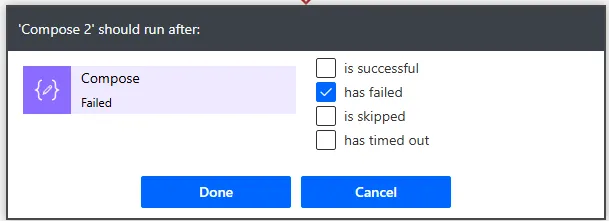
If you check 'Has Failed' a Red X appears above that flow, however it is no longer the only scenario that will run the expected action. The flow will now 'only' run that action once it has completely failed.
You can select multiple conditions, allowing an action to run in different scenarios. For example, check both "is successful" and "has failed" to make an action run regardless of whether the previous action succeeded or failed.
Example: Send error notification only on failure
1. Action: Create file in SharePoint
(Default run after: not configured, runs normally)
2. Action: Send email notification
Configure run after: "has failed"
To: admin@company.com
Subject: "File creation failed"
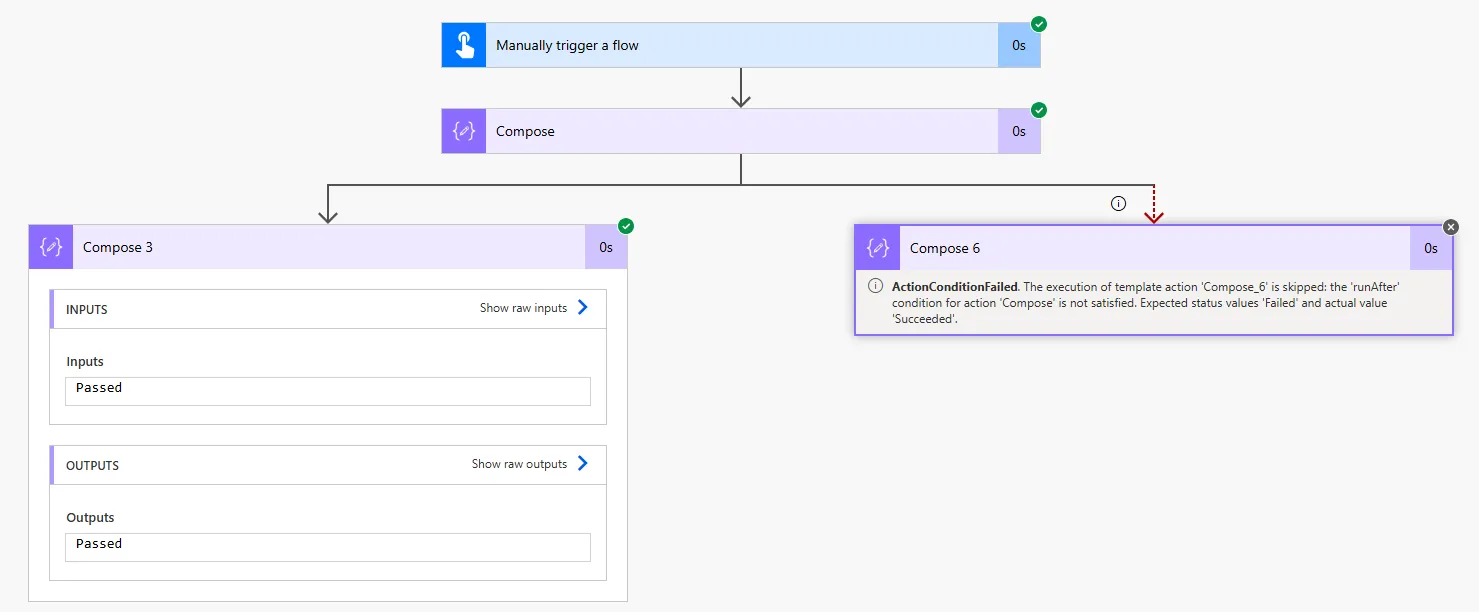
Body: Error details from previous action
If "Create file" succeeds, the email action is skipped. If "Create file" fails, the email action runs and notifies the admin.
You will also notice when you set the above below the Create File action, you will now "see" two lines for that flow action and not just 1. Line 1 (Green) = the success flow, Line 2 (Red) = the Has Failed Run After & inside there is a dotted line to the previous action. This is so that those actions are 'linked' to ensure there is an additional action that 'runs after a certain condition'.
Running cleanup actions regardless of success/failure:
Select both "is successful" and "has failed" to create cleanup actions that always run:
1. Action: Get file content
2. Action: Process data
3. Action: Delete temporary file
Configure run after: "is successful" AND "has failed"
(Runs whether processing succeeded or failed)
This pattern ensures temporary files get cleaned up even if the processing action fails.
Configure run after only looks at the immediately previous action. If you have Action A → Action B → Action C, and you configure Action C to run after "has failed", it only checks if Action B failed—not Action A. To handle failures from earlier actions, use Scope controls (covered in Container 4) which group multiple actions together.
Accessing Error Information
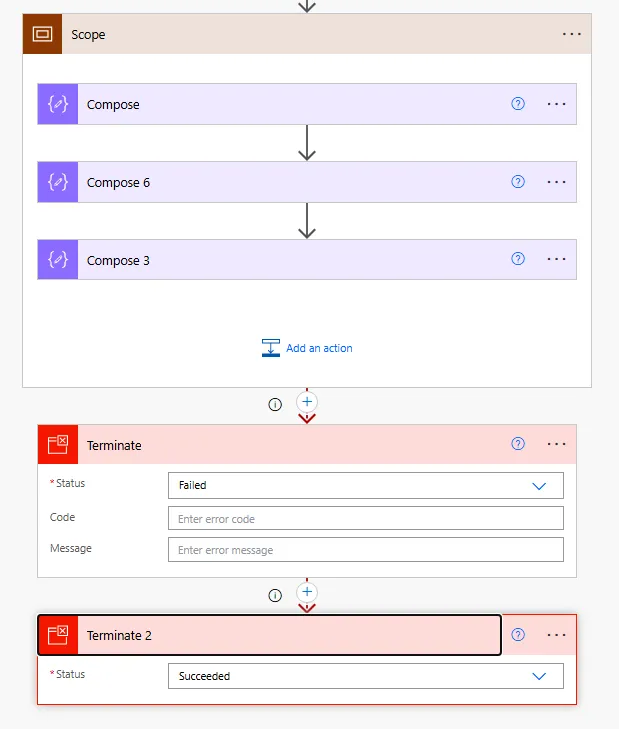
We begin with the Try-Condition method. Here we have two try catches within a flow, if we just want one the steps are exactly the same. However for illustrative purposes it may make sense if you are sending it to a flow that when if it fails you will need a Try-Catch step on it for both 'Compose 1' (imagined action failed) 'Compose 2' (imagined action failed).
When an action fails, Power Automate captures error details that you can access in subsequent actions configured to run after failure. This allows you to log specific error messages, include error codes in notifications, or make decisions based on error types.
Error output properties:
| Property | Expression | Returns |
|---|---|---|
| Error code | outputs('ActionName')?['error']?['code'] | Error identifier (e.g., "NotFound", "Unauthorized") |
| Error message | outputs('ActionName')?['error']?['message'] | Human-readable error description |
| Full error object | outputs('ActionName')?['error'] | Complete error details as JSON |
| Action status | result('ActionName')?['status'] | "Succeeded", "Failed", "Skipped", "TimedOut" |
Example: Logging error details
1. Action: Create SharePoint file
2. Action: Compose - Log Error
Configure run after: "has failed"
Inputs:
{
"Action": "Create SharePoint file",
"ErrorCode": outputs('Create_SharePoint_file')?['error']?['code'],
"ErrorMessage": outputs('Create_SharePoint_file')?['error']?['message'],
"Timestamp": utcNow()
}
This Compose action captures the error code, message, and timestamp when the file creation fails.
Conditional logic based on error type:
1. Action: Send HTTP request
2. Action: Condition - Check Error Type
Configure run after: "has failed"
Condition: outputs('Send_HTTP_request')?['error']?['code']
Equals: "NotFound"
If yes: Create the missing resource
If no: Send admin notification
This pattern handles different error types with appropriate responses—if the resource doesn't exist, create it; for other errors, alert an admin.
Including error details in notifications:
Action: Send email (runs after failure)
Subject: "Flow Failed: Create Customer Record"
Body:
Error Code: @{outputs('Create_record')?['error']?['code']}
Error Message: @{outputs('Create_record')?['error']?['message']}
Flow Run ID: @{workflow()?['run']?['name']}
Timestamp: @{utcNow()}
From then onwards we can use different things based on the if we decide to do 'both' sides e.g. Compose 1 runs as normal but should it 'fail' a different action can occur in the IF you have 2 (Different action).
This email includes specific error details and the flow run ID, making it easy for admins to investigate failures in the flow run history.
Always include workflow()?['run']?['name'] (the flow run ID) in error notifications or logs. This unique identifier lets you quickly find the exact flow run in the run history to see detailed error information, inputs, outputs, and execution timing. Without the run ID, you're searching through potentially hundreds of runs to find the failed one.
Try-Catch Pattern with Scope Actions
For the first real robust error handling requires you are wrapping a series of actions in a Scope to create "try-catch" blocks similar to what you would see in a failed run. Check out the screenshot below where the actions Compose 1 was successful and this therefore was registered as 'failed', so it used the Error handling method to 'run after' an action failed.
Scope actions group related actions together. If any action inside a Scope fails, the entire Scope is marked as failed. You can then configure another Scope to run after the first Scope fails—creating a try-catch pattern.
Basic try-catch structure:
Scope: Try
- Action 1
- Action 2
- Action 3
(If any action fails, entire Scope fails)
Scope: Catch
Configure run after: "has failed"
- Log error
- Send notification
- Execute fallback logic
Search for "Scope" and add it to your flow. Rename it to "Try" for clarity.
Drag existing actions into the Scope or add new actions within it.
After the Try scope, add another Scope and rename it to "Catch".
Click the three dots on the Catch scope → Configure run after → select "has failed".
These actions execute only if something in the Try scope fails.
Complete try-catch example:
Scope: Try
- Get items from SharePoint list
- Apply to each item:
- Create file in OneDrive
- Send email notification
Scope: Catch (Configure run after: "has failed")
- Compose: Log error details
- Send email to admin with error info
- Create item in error log list
Scope: Finally (Configure run after: "is successful" AND "has failed")
- Update process status variable
- Clean up temporary files
This pattern ensures error handling runs when the Try scope fails, and cleanup actions run regardless of success or failure.
Rename Scope actions to descriptive names like "Try - Create Records", "Catch - Error Handling", "Finally - Cleanup". Default names like "Scope", "Scope 2", "Scope 3" make flows difficult to understand and maintain. Good names make the flow's error handling structure immediately clear to anyone reviewing it months later.
Using Parallel Branches for Fallback Logic
If one or parallel branches fails, the rest of branch still runs as long as running and the end will simply it won't simply fail even if only one of the branches fails. However you must ensure you use that parallel branch method to handle errors since there might already be other branches that need to run if a branch currently running fails and simply it can't finish.
Parallel branches allow you to execute multiple independent paths simultaneously. You can use this for fallback logic—if the primary path fails, the secondary path still executes, providing an alternative approach to achieving the same result.
Parallel branch error handling pattern:
Branch 1: Primary approach
- Attempt operation using Method A
Branch 2: Fallback approach (runs in parallel)
- Attempt same operation using Method B
Result: At least one branch likely succeeds
Example: Notification with fallback
Branch 1: Send Outlook email
- Action: Send an email (V2)
- If this fails (invalid email, network issue), branch 1 fails
Branch 2: Send Teams message
- Action: Post message in Teams chat
- Runs simultaneously with email
- If email fails, Teams message still succeeds
Result: User receives notification via at least one method
This ensures critical notifications reach the user even if one notification method fails.
Sequential fallback using run after:
For scenarios where you want to try a fallback method only if the primary method fails (not in parallel), use run after instead:
1. Action: Send email (primary)
2. Action: Post Teams message (fallback)
Configure run after: "has failed"
Only runs if email sending failed
This tries email first, and only if email fails does it attempt the Teams message—saving API calls when email succeeds.
Combining parallel branches with conditions:
Branch 1: Try to create SharePoint file
Branch 2: Try to create OneDrive file
After both branches complete:
Condition: Check if either succeeded
result('Create_SharePoint_file')?['status'] equals "Succeeded"
OR
result('Create_OneDrive_file')?['status'] equals "Succeeded"
If yes: Continue workflow
If no: Both methods failed, send error notification
This pattern attempts two methods in parallel, then checks if at least one succeeded before continuing.
Note: The only result with the above steps from the Parallel Branch is that It will still run even one branches runs and not both so it may fail / time out but it won't affect the final run!
Parallel branches execute simultaneously, which can improve performance but also consume more API calls. Use parallel fallback logic for critical operations where you need redundancy (notifications to users, data backups to multiple locations). For non-critical operations or to conserve API limits, use sequential fallback with run after "has failed" instead of parallel execution.
Preventing Complete Flow Failures
In some cases, you want errors to be logged and handled, but you don't want the flow run to fail. This is important for scheduled flows that process batches—one bad record shouldn't mark the entire flow as failed.
Strategy: Terminate action with "Succeeded" status
The Terminate action stops the flow immediately but lets you specify whether the run is marked as Succeeded, Failed, or Cancelled. Use this in error handling paths to gracefully exit without failing the flow.
Scope: Try
- Process customer records
Scope: Catch (run after: "has failed")
- Log error to SharePoint list
- Send admin notification
- Terminate action
Status: Succeeded
Code: 0
Message: "Error logged, flow completed gracefully"
The flow run shows as Succeeded in the run history, but the error is still logged and the admin is notified. This prevents false "failure" alerts for flows where occasional errors are expected and handled.
When to use Terminate with Succeeded:
- Batch processing flows where some records failing is acceptable
- Flows with retry logic that eventually gives up but shouldn't alarm users
- Validation flows where "no matching records found" is a valid outcome, not an error
- Migration or import flows where errors are logged for later review
When to let the flow fail:
- Critical processes where any failure requires immediate attention
- Approval workflows where the approval must complete or the process shouldn't continue
- Integration flows where downstream systems depend on successful completion
Alternative: Allow flow to complete naturally after error handling
Instead of using Terminate, you can let the flow continue to the end after the Catch scope completes:
Scope: Try
- Main workflow
Scope: Catch (run after: "has failed")
- Error handling
Scope: Finally (run after: "is successful" AND "has failed")
- Cleanup
- Set completion variable
(Flow continues to natural end, marked as Succeeded)
If no actions after the Catch scope fail, the flow completes successfully even though the Try scope failed.
Flow run status affects monitoring dashboards, alerts, and reporting. If you use Terminate with Succeeded to hide expected errors, document this in the flow description so future maintainers understand why "successful" runs might contain error logs. Consider using custom tracking columns in SharePoint or Dataverse to record actual success vs handled errors for accurate reporting.
Next Steps
You now understand how to implement error handling in Power Automate using Configure run after, Scope actions for try-catch patterns, and Parallel branches for fallback logic. These techniques enable robust, production-ready flows that handle failures gracefully rather than stopping completely.
Expand your error handling capabilities by exploring:
- Retry policies – Configure automatic retry with exponential backoff for transient failures
- Error logging patterns – Build centralised error logging to SharePoint or Dataverse for flow monitoring
- Alert escalation – Create tiered notification systems that escalate repeated failures to management
- Circuit breaker pattern – Temporarily disable failing integrations to prevent cascading failures
- Monitoring dashboards – Build Power BI reports from error logs to identify patterns and common failures
- Child flow error handling – Strategies for handling errors when calling child flows from parent flows
- Testing error paths – Approaches for deliberately triggering failures to verify error handling works correctly
The Microsoft Power Automate error handling documentation provides comprehensive guidance on advanced error handling patterns, best practices for different connector types, and troubleshooting common error handling issues.
Need this built for your business?
We design and build production-grade Power Platform solutions for FM, Construction and Manufacturing businesses.
Book a Discovery Call →