Image Preview
1 / 1
HomeLearnHow to Attach Files to Emails in Power Automate: SharePoint Lists and Dynamic Content
✦ BeginnerDataversePower AutomateSharePoint11 min readMarch 2025

How to Attach Files to Emails in Power Automate: SharePoint Lists and Dynamic Content

Learn how to attach files to emails in Power Automate flows, whether from SharePoint lists, OneDrive, Dataverse attachments, or dynamic content. This guide covers both single and multiple file attachments, with step-by-step instructions for retrieving file content and adding it to Send an email actions.

RL
Rob Lees
Founder & Principal Consultant
Share

Overview

Attaching files to emails in Power Automate requires retrieving file content from its source (SharePoint, OneDrive, Dataverse) and passing it to the Send an email action’s Attachments field. Understanding how to work with file content, dynamic arrays, and attachment syntax is essential for building automated email notifications with supporting documents.

Prerequisites

  • Power Automate cloud flow experience
  • Understanding of SharePoint lists or OneDrive
  • Familiarity with Send an email actions
  • Basic knowledge of dynamic content and expressions

Why File Attachments Matter in Automated Emails

Many business processes require sending supporting documents alongside email notifications—invoices with purchase orders, reports with approval requests, or contracts with signature reminders. Power Automate can retrieve files from SharePoint lists, OneDrive folders, Dataverse records, or any connector that provides file content, and attach them to outgoing emails automatically.

This guide covers two common scenarios:

  • Attaching files from SharePoint lists – When list items have file attachments you need to include in emails
  • Attaching files from SharePoint document libraries – When you need to send specific documents stored in libraries

The core principle is the same across all sources: retrieve the file content (not just the filename or URL), then pass that content to the Attachments field in your Send an email action.

💡 Key Concept

File content vs file reference: You cannot simply insert a SharePoint URL or filename into the Attachments field. Power Automate needs the actual binary file content. Actions like "Get file content", "Get attachment", or "Get file content using path" retrieve this binary data, which you then pass to the email action's Attachments field.

Attaching Files from SharePoint List Items

SharePoint lists can include file attachments on individual list items. To email these attachments, you need to retrieve them from the list item and add them to your Send an email action.

Scenario: When a new invoice request is created in a SharePoint list with an attached PDF, send an approval email with the invoice PDF attached.

1
Add trigger: When an item is created or modified

Configure for your SharePoint site and list containing invoice requests.

2
Add action: Get attachments

Search for "Get attachments" from SharePoint connector. Set Site Address and List Name to match your trigger. For Item Id, select "ID" from the dynamic content (the trigger output).

Get attachments action retrieving files from SharePoint list item

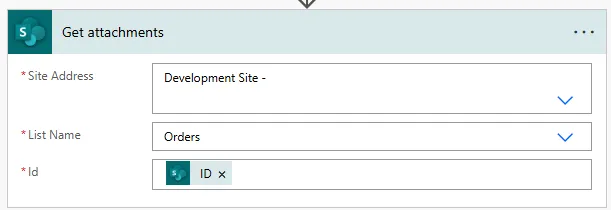
The Get attachments action returns an array of attachment metadata (filenames, IDs, URLs). However, this metadata alone cannot be used as email attachments—you still need the actual file content.

3
Add action: Apply to each

Because list items can have multiple attachments, use Apply to each to loop through them. For the input, select "value" from the Get attachments output (found under dynamic content).

4
Inside the loop: Add action Get attachment content

This action retrieves the binary file content for each attachment. Configure Site Address, List Name, and Item Id (same as before). For Attachment Id, select "Id" from the Apply to each dynamic content.

5
Still inside the loop: Add action Send an email (V2)

Configure To, Subject, and Body as needed. Click "Show advanced options" to reveal the Attachments field.

6
Click inside the Attachments field

Switch to the Expression tab in the dynamic content panel. You'll build a JSON structure that defines the attachment.

7
Enter the attachment JSON expression

Type or paste this expression into the Expression field, then click OK:

{
  "Name": @{items('Apply_to_each')?['DisplayName']},
  "ContentBytes": @{body('Get_attachment_content')}
}

This JSON structure tells Power Automate:

  • Name: The filename to display in the email (pulled from the attachment's DisplayName property)
  • ContentBytes: The binary file content (from the Get attachment content action output)

Important notes about the expression:

  • The action names in single quotes (e.g., 'Apply_to_each', 'Get_attachment_content') must exactly match your action names—Power Automate converts spaces to underscores automatically
  • If you renamed your actions to something like "Loop through attachments", use that exact name with underscores: 'Loop_through_attachments'
  • The @ symbol before curly braces tells Power Automate this is dynamic content, not literal text
⚠️ Apply to Each Placement

Place the Send an email action inside the Apply to each loop if you want to send one email per attachment (each email contains one file). Place it outside the loop with an Append to array variable pattern if you want one email with all attachments. For most scenarios, one email with all files attached is preferable—see Container 3 for that approach.

Sending One Email with All Attachments

The approach in Container 2 sends one email per attachment. For most business processes, you want one email containing all attached files. This requires building an array of attachment objects, then passing that array to the Attachments field.

1
Before the Apply to each loop: Initialize variable

Add Initialize variable action. Set Name to "AttachmentsArray", Type to "Array", and leave Value empty.

2
Inside the Apply to each loop (after Get attachment content): Add Append to array variable

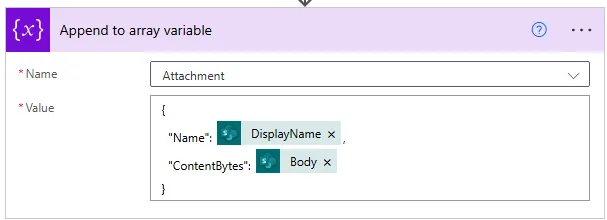
Search for "Append to array variable". Set Name to "AttachmentsArray" (matching your variable). In the Value field, switch to Expression tab and enter the same JSON structure from before.

{
  "Name": @{items('Apply_to_each')?['DisplayName']},
  "ContentBytes": @{body('Get_attachment_content')}
}
Building array of attachment objects by appending each file
3
After the Apply to each loop: Add Send an email (V2)

Configure To, Subject, Body. In the Attachments field, select "AttachmentsArray" from dynamic content (Variables section).

Flow logic summary:

  1. Trigger: When item created/modified
  2. Get attachments from list item
  3. Initialize empty array variable
  4. Apply to each attachment: Get content → Append to array
  5. Send email with AttachmentsArray

This pattern ensures one email containing all files attached to the SharePoint list item.

💡 Pro Tip

Use descriptive variable names that indicate purpose. "AttachmentsArray" is better than "varArray1". When debugging flows months later, clear naming saves significant time understanding what each variable holds and why it exists.

Attaching Files from Document Libraries

When you need to attach specific documents stored in SharePoint document libraries (rather than list item attachments), use the "Get file content" or "Get file content using path" actions.

Scenario: Send a weekly report email with the latest performance dashboard PDF from a SharePoint library.

1
Add trigger based on your schedule

For weekly reports, use Recurrence trigger set to weekly frequency.

2
Add action: Get file content using path

From SharePoint connector, select "Get file content using path". Set Site Address, then in File Path, click the folder icon to browse your library and select the specific file.

Alternatively, if you have the file path as a variable or from another action, type it directly: /sites/Reports/Shared Documents/Dashboard.pdf

3
Add action: Send an email (V2)

Configure To, Subject, Body. Show advanced options to reveal Attachments field.

4
In Attachments field, use Expression tab to build JSON

Enter this expression (adjust action name if yours differs):

{
  "Name": "Weekly_Performance_Dashboard.pdf",
  "ContentBytes": @{body('Get_file_content_using_path')}
}

For dynamic filenames (rather than hardcoded "Weekly_Performance_Dashboard.pdf"), use:

{
  "Name": @{outputs('Get_file_content_using_path')?['headers']?['x-ms-file-name']},
  "ContentBytes": @{body('Get_file_content_using_path')}
}

The x-ms-file-name header contains the actual filename from SharePoint, ensuring your attachment displays the correct name regardless of what the file is called.

Attaching multiple files from a library:

If you need to attach several specific files, repeat the Get file content using path action for each file, then build an array manually:

[
  {
    "Name": "Report_Q1.pdf",
    "ContentBytes": @{body('Get_file_content_Q1')}
  },
  {
    "Name": "Report_Q2.pdf",
    "ContentBytes": @{body('Get_file_content_Q2')}
  },
  {
    "Name": "Summary.xlsx",
    "ContentBytes": @{body('Get_file_content_Summary')}
  }
]

For dynamic scenarios (attach all files in a folder), use "List folder" action to get file paths, Apply to each to retrieve content, and the array variable pattern from Container 3.

⚠️ File Size Limits

Email attachments via Office 365 connector have size restrictions. Total attachment size per email is typically limited to 25MB–50MB depending on your tenant configuration. For larger files, consider uploading to SharePoint and sending a secure link instead of the file itself.

Attaching Files from Dataverse Records

Dataverse tables can have file or image columns. To attach these files to emails, retrieve them using Dataverse actions and pass the content to your email action.

Scenario: When a new contract record is created in Dataverse with an uploaded contract PDF, send notification email with the contract attached.

1
Add trigger: When a row is added, modified or deleted

Configure for your Dataverse environment and Contract table. Set Change type to "Added".

2
Add action: Get a row by ID

From Dataverse connector, use "Get a row by ID". Set Table name to your Contract table, and Row ID to the unique identifier from the trigger output. In "Select columns", include your file column name (e.g., cr6a3_contractdocument).

3
Add action: Send an email (V2)

Configure To, Subject, Body as needed.

4
In Attachments field, build JSON referencing Dataverse file column

The file column in Dataverse returns a value object containing the file content. Use this expression:

{
  "Name": "Contract_Document.pdf",
  "ContentBytes": @{outputs('Get_a_row_by_ID')?['body/cr6a3_contractdocument']}
}

Replace cr6a3_contractdocument with your actual file column schema name. If your file column stores filename metadata separately, reference that for the Name property:

{
  "Name": @{outputs('Get_a_row_by_ID')?['body/cr6a3_contractdocument_name']},
  "ContentBytes": @{outputs('Get_a_row_by_ID')?['body/cr6a3_contractdocument']}
}

Handling multiple file columns:

If your Dataverse table has multiple file columns to attach, create an array with multiple objects:

[
  {
    "Name": "Contract.pdf",
    "ContentBytes": @{outputs('Get_a_row_by_ID')?['body/cr6a3_contractdocument']}
  },
  {
    "Name": "Terms_and_Conditions.pdf",
    "ContentBytes": @{outputs('Get_a_row_by_ID')?['body/cr6a3_termsdocument']}
  }
]
💡 Pro Tip

Dataverse file columns store files directly in the table, unlike SharePoint attachments which are stored separately. This makes Dataverse file retrieval simpler (one Get row action vs multiple Get attachment actions), but be mindful of Dataverse storage limits when storing large files.

Troubleshooting File Attachments

File attachment flows can fail for several common reasons. Here's how to identify and resolve the most frequent issues.

Issue: "The template validation failed" error

Cause: Incorrect JSON syntax in the Attachments field. Missing quotes, commas, or curly braces will cause this error.

Solution: Validate your JSON structure. The Attachments field expects either a single object {} or an array of objects [{}]. Check for:

  • Missing comma between Name and ContentBytes
  • Missing quotes around property names
  • Mismatched curly braces or square brackets
  • Incorrect action name references in expressions
// ❌ Wrong - missing comma
{
  "Name": "file.pdf"
  "ContentBytes": @{body('Get_content')}
}

// ✓ Correct
{
  "Name": "file.pdf",
  "ContentBytes": @{body('Get_content')}
}

Issue: Email sends but has no attachment

Cause: The file content action returned no data, or the ContentBytes reference is incorrect.

Solution: Check these points:

  • Verify the Get file content / Get attachment content action actually ran and returned data (check flow run history)
  • Ensure action names in expressions match exactly (spaces become underscores)
  • Confirm the file exists at the specified path or attachment ID
  • For SharePoint lists, verify the list item actually has attachments

Issue: "Value cannot be null. Parameter name: contentBytes"

Cause: The ContentBytes property received null or empty content, usually because the Get file content action failed or the file doesn't exist.

Solution: Add a Condition before the email action to check if file content exists:

// Condition expression:
empty(body('Get_file_content'))

// If false (file content exists): Send email with attachment
// If true (file content is empty): Handle error or skip email

Issue: Attachment filename shows as "noname" or generic name

Cause: The Name property is missing or incorrectly referenced in the JSON structure.

Solution: Ensure the Name property uses the correct dynamic content:

  • For SharePoint list attachments: items('Apply_to_each')?['DisplayName']
  • For library files: outputs('Get_file_content')?['headers']?['x-ms-file-name']
  • For Dataverse: outputs('Get_row')?['body/filename_column']

Issue: "The file is too large" or email fails to send

Cause: Attachment exceeds email connector size limits (typically 25MB–50MB total per email).

Solution: Check file sizes before attaching. For files over 20MB, upload to SharePoint and send a sharing link instead:

  1. Upload file to SharePoint library using Create file action
  2. Use Create sharing link for a file or folder to generate secure link
  3. Include link in email body instead of attaching file
⚠️ Testing Tip

When testing attachment flows, use the "Test" button in flow designer with manual trigger rather than waiting for real triggers. Create a test SharePoint list item with a small PDF attachment (under 1MB) to verify the attachment logic works before deploying to production with larger files or multiple attachments.

Next Steps

You now understand how to attach files to emails from SharePoint lists, document libraries, and Dataverse records. These techniques apply to any connector that provides file content—OneDrive, Outlook attachments, Azure Blob Storage, and more.

Extend your file handling capabilities by exploring:

  • Conditional attachments – Use Condition controls to attach files only when specific criteria are met (e.g., attach invoice if amount > £5000)
  • Dynamic attachment names – Build filenames using expressions to include dates, IDs, or other metadata: concat('Report_',formatDateTime(utcNow(),'yyyy-MM-dd'),'.pdf')
  • File conversion before attaching – Use third-party connectors to convert Word documents to PDF before attaching
  • Attachment validation – Check file types and sizes before sending to prevent errors
  • Secure file sharing – For sensitive documents, create time-limited SharePoint sharing links instead of email attachments
  • Batch email with attachments – Combine with Apply to each to send personalised emails with user-specific attachments to multiple recipients

The Microsoft Office 365 Outlook connector reference provides detailed documentation on email actions, attachment syntax, and advanced email automation capabilities.

Article Info
Beginner
Suitable for those new to Power Platform.
11 min read  ·  March 2025
Prerequisites
Power Automate cloud flow experience
Understanding of SharePoint lists or OneDrive
Familiarity with Send an email actions
Basic knowledge of dynamic content and expressions

Need this built for your business?

We design and build production-grade Power Platform solutions for FM, Construction and Manufacturing businesses.

Book a Discovery Call →