Image Preview
1 / 1
HomeLearnHow to Trigger Power Automate Flows from Canvas Apps: Complete Integration Guide
⚡ IntermediatePower AppsPower Automate11 min readMarch 2025

How to Trigger Power Automate Flows from Canvas Apps: Complete Integration Guide

Learn how to trigger Power Automate cloud flows from Power Apps canvas apps, pass parameters between the app and flow, and receive return values. This guide covers building the Power Automate flow with PowerApps trigger, adding the flow to canvas apps, and handling responses for seamless app-to-flow integration.

RL
Rob Lees
Founder & Principal Consultant
Share

Overview

Power Apps canvas apps can trigger Power Automate flows to perform actions that require backend automation. While Power Apps can handle UI and simple data operations, complex business logic, external API calls, and multi-step workflows are better suited to Power Automate. Using the PowerApps trigger and flow actions in canvas apps, you can build integrated solutions where the app provides the interface and the flow handles the automation.

Prerequisites

  • Power Apps canvas app experience
  • Power Automate cloud flow experience
  • Understanding of Power Apps controls and formulas
  • Familiarity with variables and dynamic content

Why Trigger Flows from Canvas Apps?

While making canvas apps you may find yourself wanting the user of these categories to action certain buttons and workflows. For example you may want someone to enter in a SharePoint list item. So instead of trying to patch or do that yourself from the app itself, it might be easier to do it from a flow you can fire from it.

Common scenarios where flows enhance canvas apps:

  • Creating or updating records in systems the app user doesn't have direct access to
  • Sending approval requests that require workflow logic beyond simple notifications
  • Performing complex calculations or data transformations server-side
  • Calling external APIs that require authentication or complex headers
  • Triggering multi-step processes that would be cumbersome in Power Apps formulas
  • Logging audit trails or analytics to separate systems

Benefits of using flows with canvas apps:

  • Separation of concerns – UI logic stays in the app, business logic lives in flows
  • Reusability – One flow can be called by multiple apps or other flows
  • Security – Flow runs under a service account, not the app user's credentials
  • Maintainability – Update flow logic without republishing the app
  • Performance – Offload heavy processing to flows rather than running in the app
💡 Key Concept

Canvas apps can read and write data directly using connectors (SharePoint, Dataverse, etc.). Use flows when you need server-side processing, approval workflows, external API calls, or actions that require elevated permissions. The app provides the user interface; the flow handles the backend automation. This separation makes solutions easier to maintain and scale.

Building the Canvas App Interface

Let's first start out by going to canvas to build a simple App to capture details from the app that we want to build a flow with. We will eventually tie it into a flow inside the canvas app however for now we want to keep it separate so we can build a simple canvas app that we actually going to work on.

Below is a form example of how the app is set up:

Simple canvas app form collecting user inputs to pass to flow

Basic app structure:

  • TextInput_Name – Single-line text input for user's name
  • TextInput_Number1 – Text input for first number (will be converted to number in flow)
  • TextInput_Number2 – Text input for second number
  • Button_Submit – Button that will trigger the flow

This simple form captures three values that we'll pass to the Power Automate flow when the user clicks Submit. The flow will receive these parameters, perform calculations or logic, and optionally return results to the app.

Naming conventions for app controls:

  • Prefix controls by type: TextInput_, Button_, Label_, etc.
  • Use descriptive suffixes: TextInput_Name, Button_Submit, Label_Result
  • Consistent naming makes formulas easier to write and maintain
  • Avoid generic names like TextInput1, Button2—these provide no context
⚠️ Text Input Type Conversion

All text input controls return text strings, even if the user types numbers. When passing numeric values to flows, you can either convert them in the app using Value(TextInput_Number1.Text) or pass them as text and convert in the flow. For simplicity, this example passes text and lets the flow handle conversion using the Number parameter type.

Creating the Flow with PowerApps Trigger

Now let's build a simple flow that can be called from Power Apps. When Power Automate needs an instant cloud flow that's fired from a Power Apps button, the trigger is called "PowerApps", which indicates it can be called from a Canvas app. We can then decide to pass back the data.

1
Create a new instant cloud flow

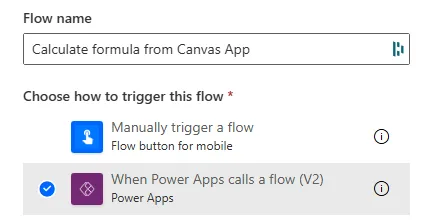
Go to Power Automate → Create → Instant cloud flow.

2
Select trigger: PowerApps (V2)

Choose "PowerApps (V2)" as the trigger. The V2 version supports typed parameters and response values.

PowerApps trigger configured to receive inputs from canvas app
3
Add input parameters

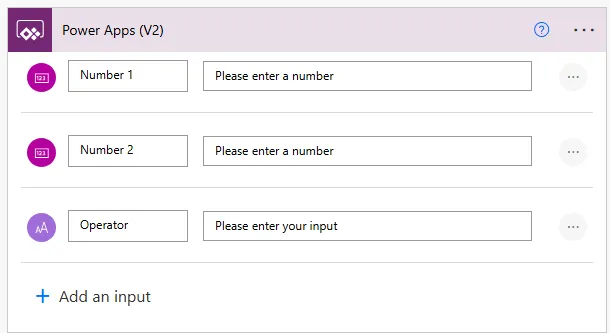
Click "+ Add an input" and define the parameters the canvas app will send. For this example: Name (Text), Number1 (Number), Number2 (Number).

We need to include these in the trigger so we can run get the dynamic content from the automation.

Parameter Name Type Purpose
Name Text User's name from TextInput_Name
Number1 Number First number for calculation
Number2 Number Second number for calculation
Input parameters defined to receive Name and two numbers from app
4
Build your flow logic

Add actions that use the input parameters. For this example, we'll add a Compose action to calculate the sum of Number1 and Number2.

// Compose action: Calculate Sum
Inputs: add(triggerBody()?['Number1'], triggerBody()?['Number2'])
5
Add "Respond to a PowerApp or flow" action

At the end of the flow, add this action to send results back to the canvas app.

6
Define output parameters

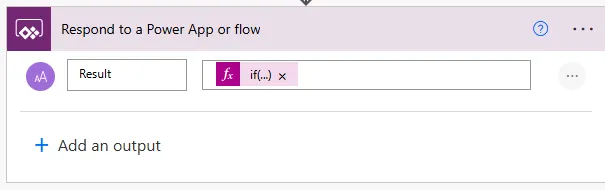
Click "+ Add an output" and define what values to return. For example: Result (Number) with value from the Compose action.

Response action sending calculated result back to canvas app

Complete flow structure:

  1. Trigger: PowerApps (V2) with inputs Name, Number1, Number2
  2. Compose: Calculate sum using add(Number1, Number2)
  3. Respond to PowerApp: Return Result (Number) from Compose output

This flow receives three parameters from the app, performs a calculation, and sends the result back. The app can display this result to the user immediately after the flow completes.

💡 Pro Tip

Save and test the flow in Power Automate before adding it to the canvas app. Use the "Test" button with manual trigger to verify the flow logic works correctly. You can enter sample values for parameters to ensure calculations, conditions, and response values are correct. This saves time debugging—fix flow issues in Power Automate before integrating with the app.

Connecting the Flow to Your App

Once we have saved the flow and it runs correctly which is this setup, we can go back to Power Apps canvas apps and add the flow to it. Below is a tutorial on how to add the flow to the flow to the power canvas app to that the user can action it.

Now we can call the flow and once it is run the flow will kick off.

1
In your canvas app, select the button that will trigger the flow

Click on Button_Submit (or your trigger button).

2
Open the Action menu

Click "Action" in the top menu bar → Power Automate.

Action menu showing Power Automate option to connect flows
3
Browse and select your flow

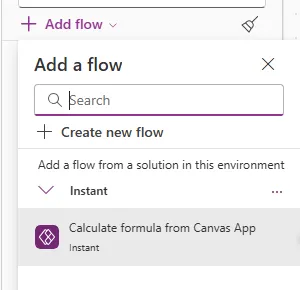
The Power Automate panel opens on the right. Find and select the flow you just created. Flows with PowerApps triggers appear in this list.

Power Apps automatically adds the flow to the button's OnSelect property. They would already created the flow however since we want to pass in the parameters we will not modify it to add those to the OnSelect event for the button. The initial auto-added code looks like this:

// Auto-generated by Power Apps
'CalculateSum-YourFlowName'.Run()
4
Modify the OnSelect formula to pass parameters

Edit the button's OnSelect property to include the input values from your form controls:

// Modified to pass parameters
'CalculateSum-YourFlowName'.Run(
    TextInput_Name.Text,
    Value(TextInput_Number1.Text),
    Value(TextInput_Number2.Text)
)

The parameters must be in the same order as defined in the PowerApps trigger. First parameter is Name (text), second is Number1 (number), third is Number2 (number).

OnSelect formula passing text input values to flow as parameters

Now when the user clicks the Submit button, Power Apps calls the flow and passes the three values from the form. The flow executes and returns the result.

⚠️ Parameter Order Matters

Parameters must be passed in exactly the same order they're defined in the PowerApps trigger. If your trigger has Name, Number1, Number2 in that sequence, you cannot pass Number1, Name, Number2 from the app—Power Automate will assign them incorrectly. The parameter names don't need to match between app and flow, but the order and types must align.

Receiving and Displaying Return Values

When the flow uses "Respond to a PowerApp or flow" action to return values, those values become available in the canvas app immediately after the flow completes. You can store them in variables or display them directly.

Storing flow response in a variable:

// Button OnSelect - Store result in variable
Set(varFlowResult,
    'CalculateSum-YourFlowName'.Run(
        TextInput_Name.Text,
        Value(TextInput_Number1.Text),
        Value(TextInput_Number2.Text)
    ).result
)

The `.result` property accesses the Result output defined in the flow's "Respond to PowerApp" action. If you named the output differently (e.g., "Sum"), use `.sum` instead.

1
Add a Label control to display the result

Insert a Label on the screen where you want to show the flow's return value.

2
Set the Label's Text property to the variable

Text property: "Result: " & varFlowResult

Alternative: Display result without variable

If you don't need to store the result long-term, call the flow directly in the Label's Text property:

// Label Text property - Direct call (not recommended for UI responsiveness)
"Result: " & 'CalculateSum-YourFlowName'.Run(
    TextInput_Name.Text,
    Value(TextInput_Number1.Text),
    Value(TextInput_Number2.Text)
).result

This approach triggers the flow every time the label recalculates, which is inefficient. Using a variable with Set() in the button's OnSelect is the recommended pattern.

Handling multiple return values:

If your flow returns multiple outputs (e.g., Sum, Product, Message), access each one:

// Flow returns: sum (Number), product (Number), message (Text)

// Button OnSelect
Set(varSum, FlowName.Run(...).sum);
Set(varProduct, FlowName.Run(...).product);
Set(varMessage, FlowName.Run(...).message)

// Better approach - call once, store result object
Set(varFlowResponse, FlowName.Run(...));

// Then access individual values
Label_Sum.Text: varFlowResponse.sum
Label_Product.Text: varFlowResponse.product
Label_Message.Text: varFlowResponse.message

Providing user feedback during flow execution:

// Button OnSelect with loading indicator
UpdateContext({isLoading: true});
Set(varResult,
    FlowName.Run(
        TextInput_Name.Text,
        Value(TextInput_Number1.Text),
        Value(TextInput_Number2.Text)
    ).result
);
UpdateContext({isLoading: false});
Notify("Calculation complete!", NotificationType.Success)

Use the `isLoading` context variable to show/hide a loading spinner while the flow runs. Set a Spinner control's Visible property to `isLoading`.

💡 Pro Tip

Always wrap flow calls in error handling using IfError(). Flows can fail for many reasons (timeouts, permissions, invalid data). Without error handling, users see cryptic error messages. Use IfError(FlowName.Run(...), Notify("An error occurred. Please try again.", NotificationType.Error)) to provide friendly user feedback when flows fail.

Complex App-to-Flow Scenarios

Passing collections to flows:

To send an array of data (like gallery selections) to a flow, use the Array parameter type in the PowerApps trigger:

// Flow trigger input: SelectedItems (Array)

// Canvas app - Button OnSelect
FlowName.Run(
    Gallery_Items.AllItems
)

The flow receives the entire collection and can loop through it using Apply to each.

Conditional flow execution:

// Only run flow if validation passes
If(
    !IsBlank(TextInput_Name.Text) && 
    !IsBlank(TextInput_Number1.Text),
    
    // Validation passed - run flow
    Set(varResult, FlowName.Run(...).result),
    
    // Validation failed - show error
    Notify("Please fill in all fields", NotificationType.Error)
)

Triggering multiple flows in sequence:

// Button OnSelect - orchestrate multiple flows
UpdateContext({isProcessing: true});

// Step 1: Validate data
Set(varValidation, FlowValidate.Run(TextInput_Email.Text).isValid);

If(varValidation,
    // Step 2: Create record if validation passed
    Set(varRecordID, FlowCreateRecord.Run(...).recordID);
    
    // Step 3: Send notification
    FlowSendEmail.Run(varRecordID, TextInput_Email.Text);
    
    Notify("Process complete!", NotificationType.Success),
    
    // Validation failed
    Notify("Invalid email address", NotificationType.Error)
);

UpdateContext({isProcessing: false})

Parallel flow execution with Concurrent():

// Run multiple independent flows simultaneously
Concurrent(
    Set(varResult1, Flow1.Run(...).output),
    Set(varResult2, Flow2.Run(...).output),
    Set(varResult3, Flow3.Run(...).output)
);

// All three flows run in parallel
// Continue after all complete

Using flow results for navigation:

// Create record in flow, navigate to details screen with returned ID
Set(varNewRecordID, FlowCreateContact.Run(...).contactID);

Navigate(
    ContactDetailsScreen,
    ScreenTransition.None,
    {varContactID: varNewRecordID}
)
⚠️ Flow Execution Timeout

Canvas apps wait for flows to complete, but there's a timeout limit (typically 30 seconds for synchronous calls). If your flow performs complex operations that take longer than 30 seconds, consider using asynchronous patterns where the flow sends results via email or creates a notification record that the app polls, rather than waiting for the direct response.

Next Steps

You now understand how to trigger Power Automate flows from canvas apps, pass parameters from app controls to flows, and receive return values to display in the app. This integration enables powerful automation while maintaining a clean separation between UI and business logic.

Expand your app-to-flow integration capabilities by exploring:

  • Error handling patterns – Use IfError() to gracefully handle flow failures and provide user-friendly error messages
  • Asynchronous flow patterns – For long-running flows, trigger them without waiting and poll for completion using timers
  • Flow monitoring from apps – Display flow run history or status information within the canvas app interface
  • Shared authentication – Understanding how user context passes from app to flow for data access
  • Testing strategies – Approaches for testing app-to-flow integration including test flows with mock data
  • Performance optimisation – Minimising flow calls, caching results, and using Concurrent() for parallel execution
  • Security patterns – Best practices for handling sensitive data passed between apps and flows

The Microsoft Power Apps documentation on flows provides comprehensive guidance on advanced integration patterns, troubleshooting common issues, and best practices for building robust app-to-flow solutions.

Article Info
Intermediate
Assumes working knowledge of Power Automate and basic concepts.
11 min read  ·  March 2025
Prerequisites
Power Apps canvas app experience
Power Automate cloud flow experience
Understanding of Power Apps controls and formulas
Familiarity with variables and dynamic content

Need this built for your business?

We design and build production-grade Power Platform solutions for FM, Construction and Manufacturing businesses.

Book a Discovery Call →