Overview
Power Automate is Microsoft’s workflow automation platform that connects apps and services to automate repetitive tasks. Understanding triggers, actions, and flow logic is essential for building reliable automations that save time and reduce manual errors across your organisation.
Prerequisites
- A Microsoft 365 account with Power Automate access
- Maker permissions in a Power Platform environment
- Basic understanding of business processes and workflows
- Familiarity with Microsoft 365 apps (Outlook, SharePoint, Teams) helpful but not required
What is Power Automate?
Power Automate (formerly Microsoft Flow) is a cloud-based workflow automation service that connects your apps, data, and services. It automates repetitive tasks without writing code—when something happens in one app, Power Automate can automatically trigger actions in other apps.
Common automation scenarios:
| Trigger | Action | Business Value |
|---|---|---|
| Email arrives with "Invoice" in subject | Save attachment to SharePoint, notify accounts team | Eliminates manual email monitoring |
| New row added to Excel Online | Create Dataverse record, send confirmation email | Instant data synchronisation |
| SharePoint file uploaded | Request approval, move to archive after approval | Enforces document review process |
| Teams message mentions you | Add task to Planner, send mobile notification | Never miss action items |
| Form submitted | Create record, assign to team member, send acknowledgement | Automated request routing |
Why Power Automate matters:
- Saves time – Automate tasks that consume 30+ minutes daily per person
- Reduces errors – Workflows execute consistently without forgetting steps
- Improves compliance – Enforce approval chains and audit trails automatically
- Connects everything – 400+ connectors to Microsoft and third-party services
- Scales easily – One flow can handle thousands of executions monthly
Power Automate comes in three types:
- Cloud flows – Automated workflows running in the cloud (what we're building today)
- Desktop flows – Robotic process automation (RPA) for legacy desktop applications
- Business process flows – Guided workflows that walk users through stages in Model-Driven Apps
This guide focuses on cloud flows—the most common automation type for business users.
Think of Power Automate as "if this, then that" logic for business apps. When a trigger event occurs (email arrives, file uploads, button clicked), Power Automate executes a sequence of actions (create record, send notification, update spreadsheet). No coding required.
Accessing the Power Automate Portal
Power Automate lives at make.powerautomate.com—your central hub for creating, managing, and monitoring all workflows.
Getting started:
- Navigate to make.powerautomate.com in your browser
- Sign in with your Microsoft 365 account
- Select your environment from the top-right dropdown
- Click + Create to start building a flow
Understanding the interface:
| Section | Purpose | What You'll Find |
|---|---|---|
| Home | Dashboard and quick actions | Recent flows, templates, recommendations |
| My flows | All flows you own or have access to | Active flows, run history, edit/delete options |
| Templates | Pre-built flows for common scenarios | Hundreds of ready-to-use automations |
| Connectors | Browse available services | 400+ apps and services you can connect |
| Data | View Dataverse tables and connections | Tables, connections, custom connectors |
Always verify you're in the correct environment before creating flows. Building in the Default environment pollutes a shared space and prevents proper lifecycle management. Use a dedicated Development or Sandbox environment for learning and testing.
Building an Automated Cloud Flow
We'll build a practical flow: when an email arrives with "Invoice" in the subject line, save the attachment to SharePoint and notify the accounts team.
Step 1: Choose flow type
- Click + Create from the left navigation
- Select Automated cloud flow
- Give your flow a descriptive name: "Invoice Email to SharePoint"
- Choose your trigger (or click "Skip" to select it in the designer)
Flow types explained:
| Flow Type | When It Runs | Example Use Case |
|---|---|---|
| Automated cloud flow | When an event occurs (email arrives, file created, record updated) | Process invoices when emails arrive |
| Instant cloud flow | When you manually click a button (in Power Apps, Teams, or mobile) | Request approval for expense report |
| Scheduled cloud flow | On a recurring schedule (daily at 9am, weekly on Mondays) | Generate weekly sales report every Friday |
Configuring the Trigger
Every flow starts with a trigger—the event that kicks off the automation. Triggers watch for specific conditions and fire when those conditions are met.
For our invoice processing flow:
- In the trigger search box, type "when a new email arrives"
- Select When a new email arrives (V3) from Office 365 Outlook
- Click Create to enter the flow designer
The flow designer opens with your trigger as the first step. Now we'll configure it to watch for invoice emails specifically.
Trigger configuration:
- Click Show advanced options to reveal all filter settings
- Set Subject Filter to: Invoice
- Set Include Attachments to: Yes
- Leave Folder as Inbox (or select a specific folder)
This trigger now fires only when emails arrive in your inbox with "Invoice" anywhere in the subject line and at least one attachment.
Common trigger types:
| Trigger | Service | When It Fires |
|---|---|---|
| When a new email arrives | Office 365 Outlook | Email received matching filters |
| When a file is created | SharePoint | New file uploaded to library |
| When a record is created | Dataverse | New record added to table |
| When a HTTP request is received | Request | Webhook called from external system |
| Recurrence | Schedule | Timer expires (daily, weekly, monthly) |
Adding Actions to Process the Email
Actions are the steps your flow performs after the trigger fires. Each action calls a connector to perform a specific task—create a file, send an email, update a record.
Action 1: Save attachment to SharePoint
- Click + New step below the trigger
- Search for "create file"
- Select Create file from SharePoint
- Configure the action:
| Field | Value | Explanation |
|---|---|---|
| Site Address | Select your SharePoint site | Where the document library lives |
| Folder Path | Select the target library/folder | Where to save the file |
| File Name | Click → Add dynamic content → Attachments Name | Uses the original attachment filename |
| File Content | Click → Add dynamic content → Attachments Content | The actual file data |
Understanding dynamic content:
Dynamic content inserts data from previous steps in the flow. When you select "Attachments Name", Power Automate doesn't insert the literal text "Attachments Name"—it inserts the actual filename from the email attachment at runtime.
Common dynamic content sources:
- From triggers – Email subject, sender, body, attachments
- From actions – Created record ID, file path, response data
- From expressions – Formatted dates, concatenated strings, calculated values
When you use "Attachments" dynamic content, Power Automate automatically wraps the action in an "Apply to each" loop because emails can have multiple attachments. This loop runs once for each attachment, saving all files from the email. If you only want the first attachment, you'll need to use expressions to extract it.
Adding Email Notifications
After saving the attachment, we'll notify the accounts team so they can process the invoice.
Action 2: Send notification email
- Click + New step after the Create file action
- Search for "send an email"
- Select Send an email (V2) from Office 365 Outlook
- Configure the email:
| Field | Value | Example |
|---|---|---|
| To | Accounts team email address | accounts@powertech365.co.uk |
| Subject | New Invoice Received | Static text or use dynamic content from email subject |
| Body | Compose message with dynamic content | An invoice from [From] has been saved to SharePoint. |
Building the email body with dynamic content:
An invoice email has been received and processed.

From: [Dynamic: From]
Subject: [Dynamic: Subject]
Received: [Dynamic: Date Time Received]

The attachment has been saved to:
[Dynamic: Path] (from Create file action)

Please review and process this invoice.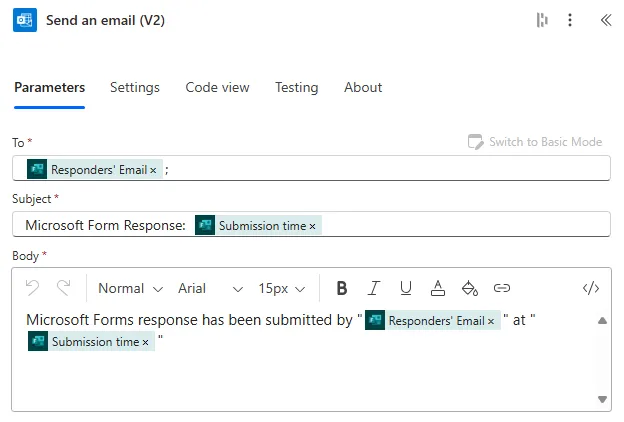
Formatting email bodies:
- Use line breaks (Enter key) to separate paragraphs
- Mix static text with dynamic content for context
- Include relevant details (sender, date, file path) for recipient action
- Keep messages concise—recipients scan emails quickly
For formatted emails with bold text, tables, or images, use the "Send an email (V2)" action and click the "Show advanced options" button. This reveals an "Is HTML" toggle. When enabled, you can write HTML directly in the Body field for rich formatting.
Adding Conditional Logic
Conditions let flows make decisions. We'll add a check: only save the attachment if it's a PDF file. Non-PDF attachments will be ignored.
Adding a condition:
- Click the ... menu on the "Apply to each" loop (the one containing Create file)
- Select Add an action inside the loop, before Create file
- Search for "condition"
- Select Condition from the Control connector
Configuring the condition:
| Field | Operator | Value |
|---|---|---|
| Attachments Name (dynamic content) | ends with |
This creates a branch:
- If yes – Attachment filename ends with .pdf → save to SharePoint
- If no – Attachment is not PDF → do nothing (or send different notification)
Move the "Create file" action into the "If yes" branch by dragging it, or delete it and recreate it inside the yes branch.
Common condition operators:
| Operator | Purpose | Example |
|---|---|---|
| is equal to | Exact match | Status is equal to "Approved" |
| is not equal to | Not a match | Priority is not equal to "Low" |
| contains | Partial text match | Subject contains "Urgent" |
| does not contain | Text not present | Email does not contain "Spam" |
| starts with | Text prefix | Filename starts with "INV-" |
| ends with | Text suffix | Filename ends with ".pdf" |
| is greater than | Number/date comparison | Amount is greater than 1000 |
| is less than | Number/date comparison | Days overdue is less than 7 |
Advanced conditions:
Click "Add" within a condition to create AND/OR groups:
- AND – All conditions must be true (filename ends with .pdf AND file size < 10MB)
- OR – Any condition can be true (filename ends with .pdf OR .docx OR .xlsx)
Saving and Testing the Flow
Before deploying a flow to production, test it thoroughly to catch errors and validate behaviour.
Saving your flow:
- Click Save in the top-right corner
- Wait for the save operation to complete
- The flow is now active and will trigger automatically
Testing methods:
Method 1: Trigger the flow naturally
Send yourself a test email with "Invoice" in the subject and a PDF attachment. The flow should trigger within 2-3 minutes.
Method 2: Use Test in the designer
- Click Test in the top-right corner
- Select Manually
- Click Test
- Trigger the event (send test email)
- Watch the flow execute in real-time
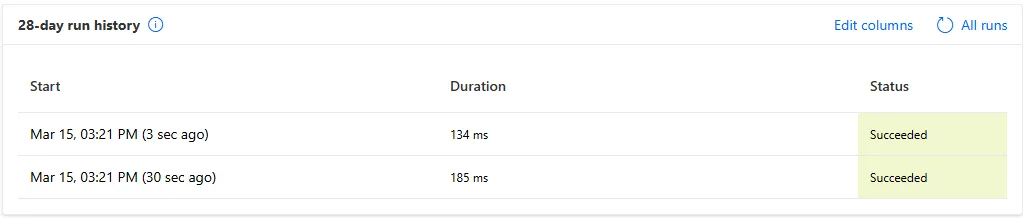
Reading test results:
During test execution, each action displays a status:
- Green tick – Action succeeded
- Red X – Action failed (click to see error details)
- Grey skip icon – Action was skipped (condition evaluated to false)
Click any action to expand it and see:
- Inputs – What data was sent to the connector
- Outputs – What data came back from the connector
- Duration – How long the action took
Troubleshooting Flow Errors
When flows fail, Power Automate provides detailed error messages to help diagnose the problem.
Common error scenarios:
| Error Message | Cause | Solution |
|---|---|---|
| Unauthorized | Connection expired or lacks permissions | Reconnect the service in Connections |
| Item not found | Referenced file/record was deleted | Add condition to check if item exists first |
| Invalid template expression | Syntax error in dynamic content/expression | Check brackets, quotes, function names |
| Timeout | Action took longer than 2 minutes (default limit) | Optimise query, increase timeout, split into smaller steps |
| BadRequest | Invalid data sent to connector (wrong format, missing required field) | Check inputs match connector expectations |
Debugging workflow:
- Go to My flows → select your flow
- Click the 28-day run history tab
- Click a failed run (red X icon)
- Expand the failed action to read the error
- Check inputs—was the data in the expected format?
- Fix the issue in the flow designer and retest
Add "Compose" actions throughout your flow during development to output variable values and intermediate data. These act as debug breakpoints—you can see exactly what data exists at each step. Remove them once the flow works reliably.
Configure run after settings:
By default, actions only run if the previous action succeeded. You can change this:
- Click the ... menu on any action
- Select Configure run after
- Choose when this action should run:
- is successful (default)
- has failed
- is skipped
- has timed out
This lets you build error handling—for example, send an alert email if the Create file action fails.
Understanding Connections
Connections are the authenticated links between Power Automate and external services. Each connector (SharePoint, Outlook, Dataverse) requires a connection.
How connections work:
When you add an action from a connector you haven't used before, Power Automate prompts you to create a connection. You sign in to that service, grant Power Automate permission, and the connection is saved for future use.
Managing connections:
- Go to Data → Connections
- View all saved connections
- Click a connection to view which flows use it
- Delete broken connections via the ... menu
Connection issues:
| Problem | Cause | Solution |
|---|---|---|
| Flow fails with "Unauthorized" | Connection expired or password changed | Edit flow → reconnect the action → save |
| Can't see files/folders | Connection authenticated as wrong user | Delete connection → create new one with correct account |
| Permission denied errors | Connection lacks required permissions | Admin must grant permissions in Azure AD/Microsoft 365 |
When you share a flow with colleagues, connections do NOT transfer automatically. Each person must create their own connections. This is a security feature—your SharePoint/Outlook credentials stay private. For flows requiring shared access (like a team mailbox), create connections using a service account that all makers can authenticate as.
Adding Approval Workflows
Approvals let you route decisions through people—manager approval for expenses, document review before publishing, purchase order sign-off.
Building an approval flow:
We'll modify our invoice flow to require manager approval before saving to SharePoint.
- Add a new action after the email trigger
- Search for "start and wait for an approval"
- Select Start and wait for an approval from Approvals connector
- Configure the approval request:
| Field | Value | Purpose |
|---|---|---|
| Approval type | Approve/Reject - First to respond | One approver makes the decision |
| Title | Invoice Approval Required | Short description approver sees |
| Assigned to | manager@powertech365.co.uk | Who receives the approval request |
| Details | Invoice from [Dynamic: From] needs review | Context for decision |
| Item link | Link to email or attachment (optional) | Direct access to source document |
Handling approval responses:
After the approval action, add a Condition to check the outcome:
| Field | Operator | Value |
|---|---|---|
| Outcome (dynamic content from approval) | is equal to | Approve |
If yes (approved):
- Save attachment to SharePoint
- Send confirmation email to accounts team
If no (rejected):
- Send rejection email back to original sender
- Log rejection details to a list
Approval types explained:
| Approval Type | When to Use | Behaviour |
|---|---|---|
| Approve/Reject - First to respond | One person needs to approve | Flow continues as soon as first approver responds |
| Approve/Reject - Everyone must approve | Multiple approvers, all must agree | Flow waits for all responses, fails if any reject |
| Custom Responses - Wait for all responses | Survey-style, multiple options beyond approve/reject | Flow waits for all assigned users to respond |
Where approvers see requests:
- Email – Notification with Approve/Reject buttons
- Teams – Approvals app shows pending requests
- Power Automate mobile app – Push notifications
- Approvals portal – make.powerautomate.com → Approvals
Power Automate Best Practices
Flow design principles:
- Descriptive names – "Invoice Email to SharePoint with Approval" not "My Flow 1"
- Add descriptions – Document what the flow does, who owns it, when it was created
- Rename actions – Change "Create file" to "Save invoice PDF to SharePoint" for clarity
- Use comments – Add note actions to explain complex logic for future maintainers
- One purpose per flow – Don't combine unrelated automations in a single flow
Performance optimisation:
- Filter at the trigger – Reduce unnecessary flow runs with trigger conditions
- Limit loops – Apply to each loops with 1000+ items will timeout; use pagination instead
- Parallel branches – Run independent actions simultaneously using parallel branches
- Avoid polling – Use webhooks/instant triggers instead of scheduled checks every minute
- Batch operations – Group Create/Update actions rather than looping one record at a time
Error handling:
- Configure run after – Add error handling actions that run when previous steps fail
- Try-catch pattern – Use parallel branches with Configure run after to simulate try-catch
- Terminate actions – Fail flows explicitly when critical errors occur
- Send failure notifications – Email yourself when critical flows fail
- Log to SharePoint – Keep audit trail of all flow runs in a list
Security and compliance:
- Never hard-code credentials – Use Azure Key Vault or environment variables for secrets
- Principle of least privilege – Connections should have minimum required permissions
- Service accounts for shared flows – Don't use personal accounts for team automations
- DLP policies – Understand which connectors are allowed in your environment
- Audit flow ownership – Document who owns each flow and transfer ownership when people leave
- Default names (Flow 1, Flow 2)
- No error handling whatsoever
- Hard-coded values everywhere
- No documentation or comments
- Personal account connections
- Descriptive business-focused names
- Comprehensive error handling
- Environment variables for config
- Comments explaining complex logic
- Service account connections
Next Steps
You've now built your first Power Automate cloud flow with triggers, actions, conditions, and approvals. Expand your automation skills by exploring:
- Expressions and functions – Format dates, manipulate strings, perform calculations in dynamic content
- Child flows – Build reusable sub-flows called from parent flows
- HTTP connectors – Call REST APIs to integrate with any web service
- Custom connectors – Build your own connectors for proprietary systems
- Desktop flows (RPA) – Automate legacy desktop applications with robotic process automation
- Solutions – Package flows for deployment across environments
- ALM with pipelines – CI/CD workflows for enterprise Power Automate development
The official Microsoft Power Automate documentation provides comprehensive guides on advanced flow patterns, connector-specific techniques, and enterprise administration.
Start with simple automations that save 15-30 minutes daily. Once comfortable with basic flows, tackle more complex scenarios requiring loops, parallel processing, and error handling. Power Automate's real value emerges when you chain multiple flows together to orchestrate entire business processes end-to-end.
Need Power Automate built properly?
We design and deliver production-grade Power Automate workflows for FM, construction, and manufacturing businesses across the UK.
Explore Power Automate →Need Microsoft 365 working as one system?
We connect SharePoint, Teams, and the wider Microsoft 365 stack into automated workflows for FM, construction, and manufacturing businesses across the UK.
Explore Microsoft 365 Integration →